My Green Roof

... describing the installation of a green roof by a pair of 50-ish avid gardeners

Friday, April 27, 2012

This blog is still active

If you have not gotten a response from me, Google and I were not communicating.  It should be fixed now. 

Monday, October 10, 2005

Early October pictures of my green roof

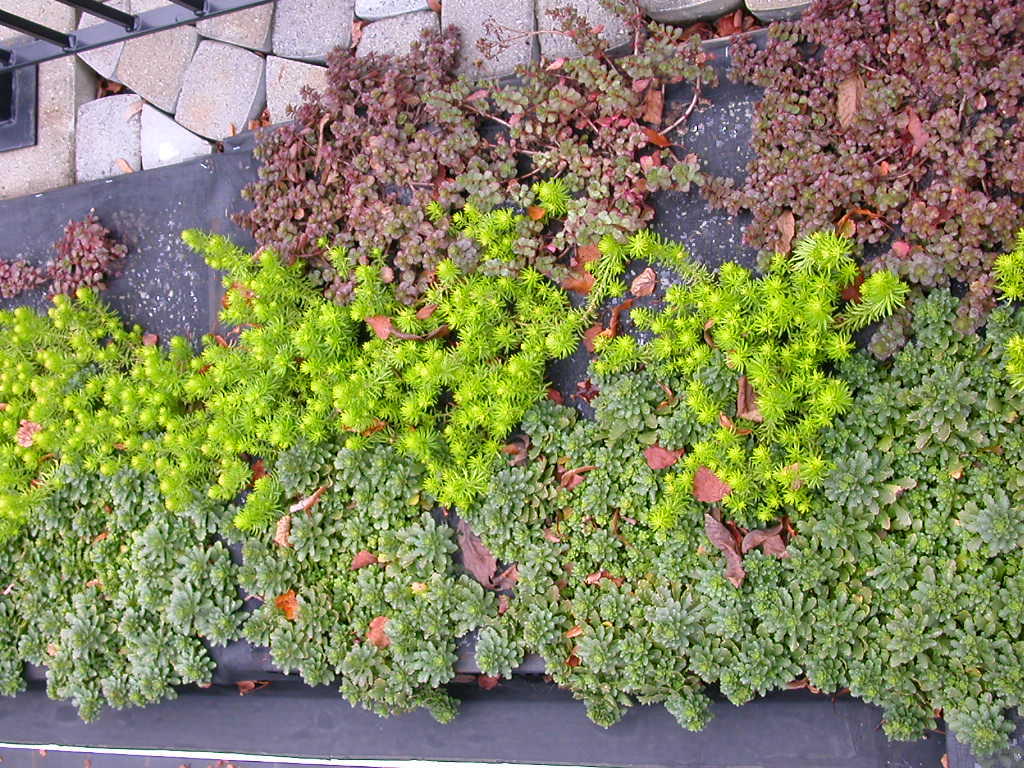
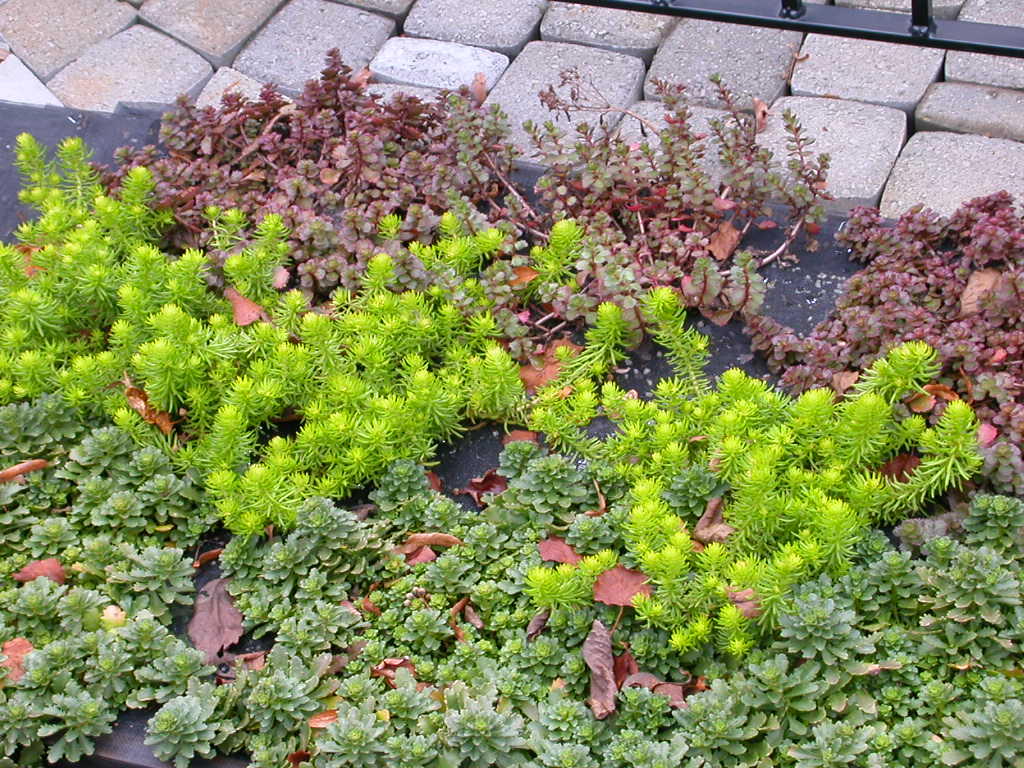
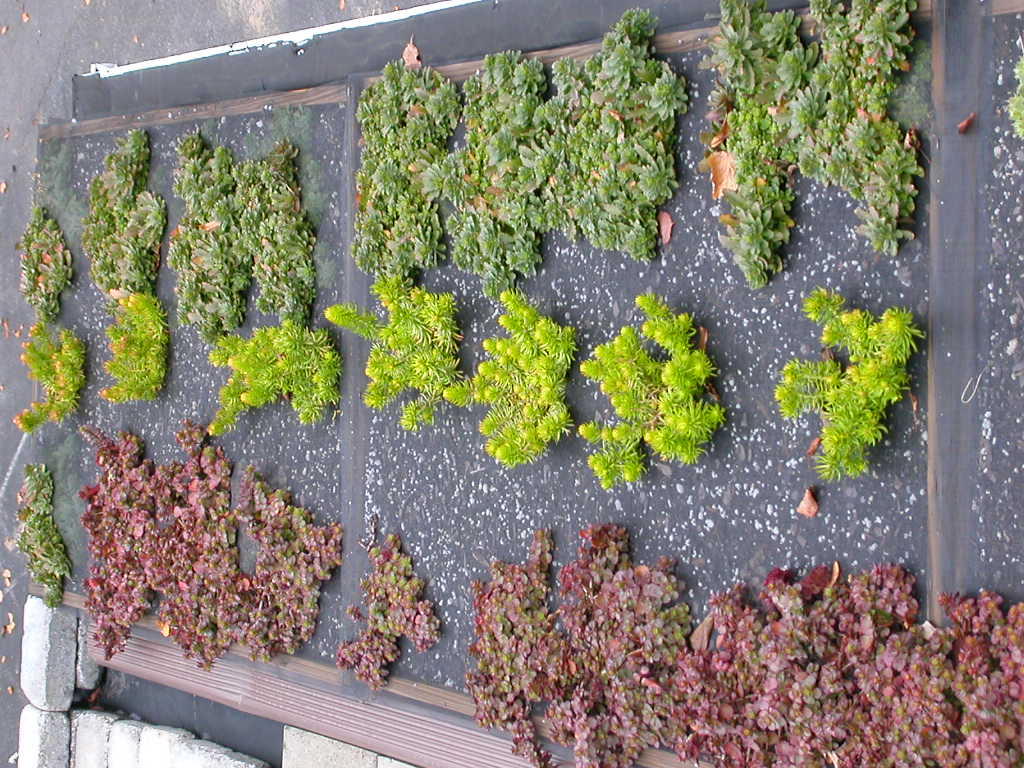
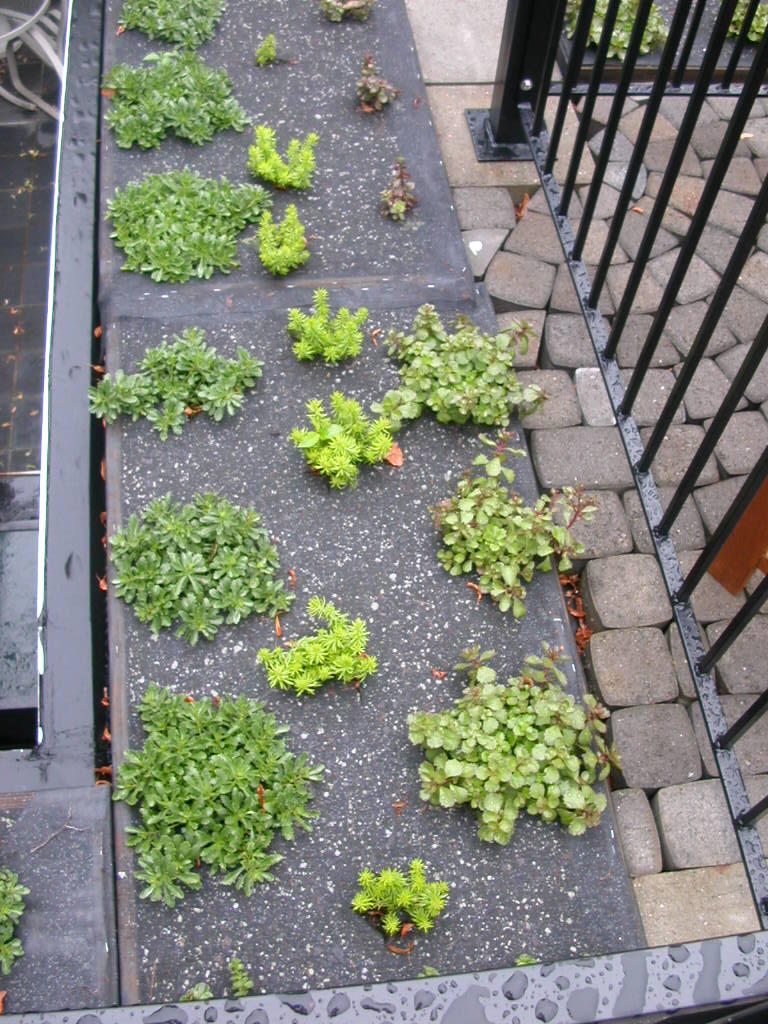
The images below were taken on 10-October-2005.


Remember, these were from 3-inch single stem tip cuttings taken in May 05. S. kamschaticum on the bottom (outside edge); S. rupestre 'Angelina' in the middle; S. spurium 'Dragon's Blood' on the inside.


Same grouping, a little closer.


Different grouping, planted later and without multiple florel treatments.


Different grouping from both of the above. Just kamschaticum and spurium. Whatever we had in the middle didn't make it.

And that's the next goal. No real changes for the winter, although I will trial some dwarf daffs up there. Next spring, we see how the sedums have survived. There are more sedums already propagated, waiting to fill in any gaps that may develop.

Wednesday, July 20, 2005

Mid-summer pix of our green roof install, planting-plus-45 days

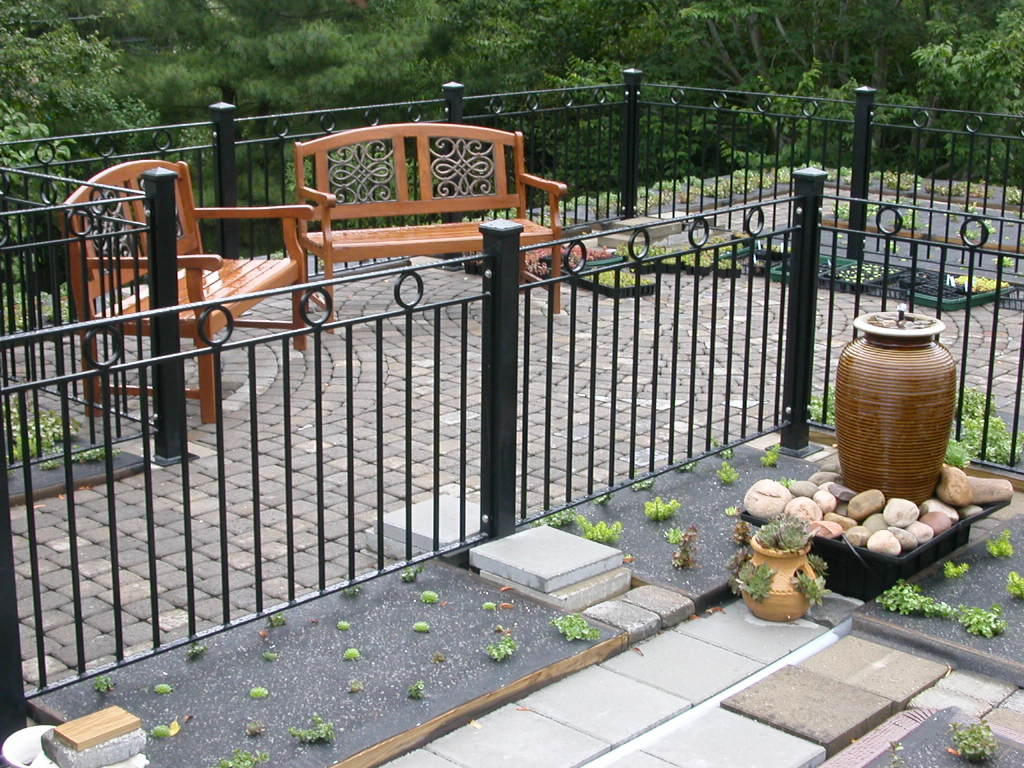
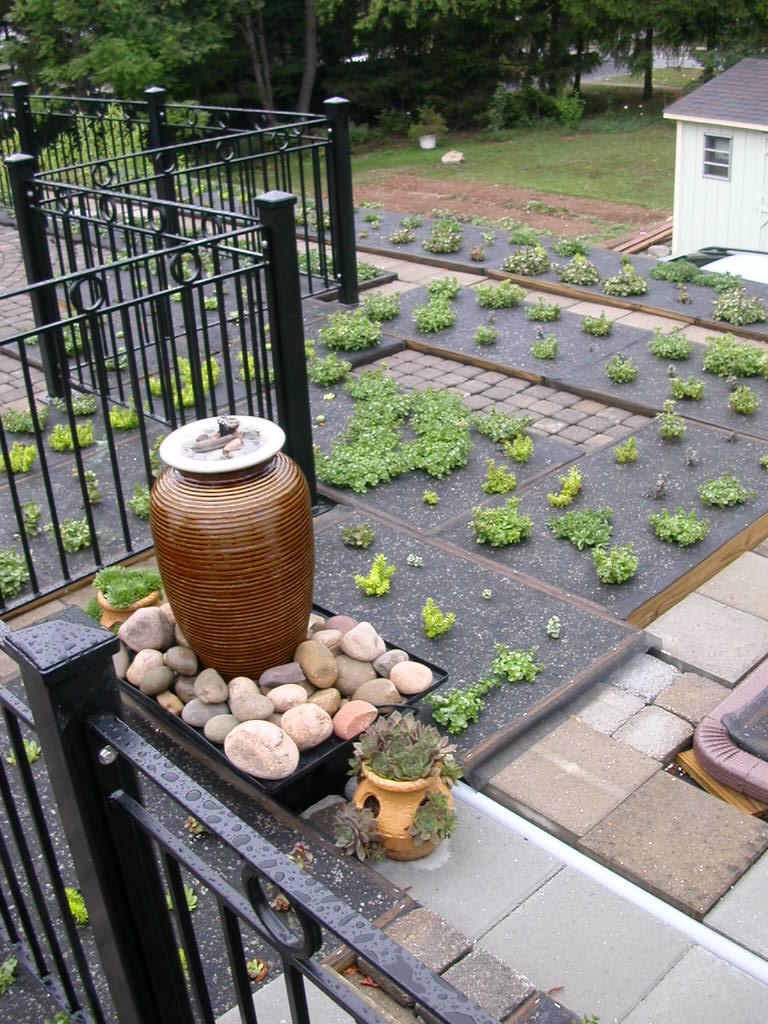
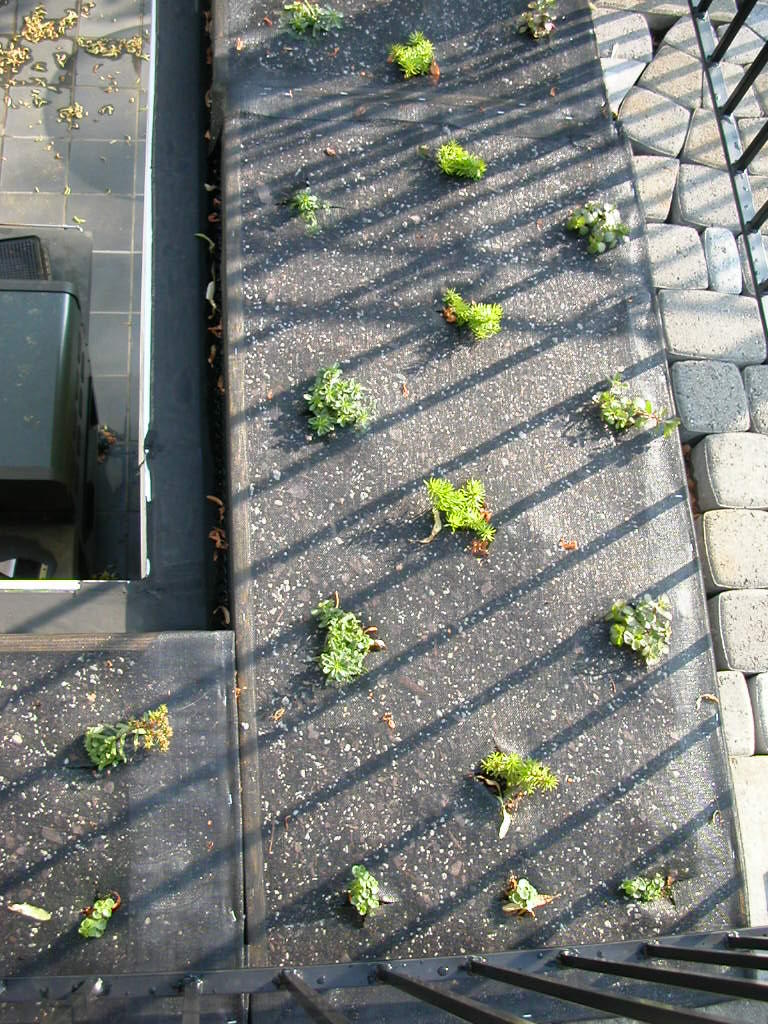
Here are pictures of the completed installation. Plants are beginning to fill in nicely. There is a definite positive advantage in terms of spread on the Florel-treated plants. I'll do a more controlled study in the near future to better document the process. But the treated plants branched quickly and fully. This translates into quicker spread.


This is a shot of the same bed as a month ago. Sedum kamschaticum to the left, S. rupestre in the middle, S. spurium on the right. Notice how full these plants are. Each of these was a single-stem cutting in April. This shot was taken on 15-Jul-05.


This shot is of another bed. S. kamschaticum and S. spurium are usually constant around the roof, but the species and cultivars running down the middle of the bed will vary. Some are already clearly more successful than others.


This is of the roof garden, complete with water feature and a couple of benches. If you look through the railing, you can see that I've still got material in flats to install. There are gaps along the boxes where the concrete paver circles are not quite complete. We did not cut additional pavers for the re-install. We simply re-used what we had done originally. As a result, some of the edges of the circles are not entirely complete. We'll fill those in with planting mix, and plug in some additional sedum cuttings. This should soften the edges of the boxes effectively.

You might notice that the plants in the boxes closest to the railing in this shot are still pretty small. Two things. One, this round of propagations did not get a second dose of Florel, and two, these were planted the weekend of the 4th of July, only a couple of weeks ago.

If you look closely, you can see two "solutions" in the photo as well. The white pipe that you can see simply is a tube for the power cord of the fountain. And if you can see the brown gutter, we're directing the downspout from the roof gutter across the roof garden to the guttering of the garage roof. My original intent had been to create a dry creek bed across the garden for this water. However, once the boxes were in place, it was simpler just to run a piece of downspout along the boxes, turn the corner, and empty to the gutter.


This is a similar shot, different angle. The large plants nearest the fence are S. spurium 'Leningrad White'. These are growing extremely well. Again, these were single-stem cuttings in late April.


Close-up of the water feature. Those strawberry pots are sempervivums, $12 pots from Lowe's. I've plucked out a couple dozen chicks when we bought them ca. Memorial Day, and popped them into some of the beds. We'll see how hardy these are. If they fail the winter test, I'll replace them with known hardy semps from Squaw Mountain.


We had been considering building a wooden stile over the railing in a couple of places to make it easy to maintain the beds. As we were doing the pavers, this occurred to us. A couple of 12x12 pavers stacked near a post make a simple, inobstrusive stile.

I'll do my best to post pictures on a monthly basis. There is a little filling in to do where there were transplants failures. I've got bulbs coming in for September install, including up on the green roof. Plus, I'll probably plug in a few spots of pansies, just to see how they survive the winter on the green roof.

Tuesday, June 14, 2005

Green Roof pictures: early summer 2005, filling and planting

Finally, Blogger has an easy way to post images. Hurray!

Here are images of our planting boxes. Treated 1x4 lumber, with the corners reinforced by 3" pieces of treated 2x2s. Fiberglass screen on the bottom, stapled in place, and then stapled on one side only until the boxes are filled. The structure with the reinforced corners is stable.


Here are the boxes, ready to fill.


Filling the boxes, first with coarse horticultural grade perlite. Filled to roughly half-depth.


And then with MetroMix 560. We patted the media in each box down and crowned the fill just a little. The screening was then stretched over the MetroMix, and stapled down all around.


Filled boxes, ready to plant.


First planting. I've got Sedum kamschaticum on the outside; S. rupestre 'Angelina' down the middle, and S. spurium 'Dragon's Blood' on the inside. Oh, and there are three S. spurium 'John Creech' closest to the bottom (the smallest plants). All of these transplants were put in the beds around Memorial Day, from single-stem cuttings taken in April, 2005. Cuttings were treated with two sprays of Florel at ca. 250 ppm to induce branching.


Subsequent posts will include this same shot, so that you can watch the plants grow and fill in.

Tuesday, June 07, 2005

It works --- my green roof works!

Pictures soon.

The green roof remains at about 80% complete. We need to build another 6 or 7 boxes, but have run out of planting mix. That delivery should occur next week.

The sedums and sempervivums have been planted and are looking very happy. These are the plants that are currently in place:

--- Sedum spurium 'Dragon's Blood'
--- S. spurium 'John Creech'
--- S. spurium 'Leningrad White'
--- S. kamschaticum 'Weistephaner Gold'
--- S. rupestre 'Angelina'
--- S. tetractinum
--- S. ussuriense

I've also got three or four other dark-leaved forms of more-or-less creeping sedums --- and all demonstrated to be winter-hardy --- mixed in. I've got a handful of other sedum species which I will trial in some of the beds, but the species above represent >90% of what we installed. I've also got an extensive wish list of both sedums and semps to try out on my green roof, but these species will be the anchors.

The sempervivums are not named cultivars, at least not in my hands. There are two large-ish green forms, one of which has red leaf tips. There is a large purple leaf form. And there is a medium-green, hairy, flat form. These are clustered in the beds, and should mound a bit to give some textural contrast to the groundcover of mostly sedums.

Addresses and links to the places where we mail-ordered the sedums are to the right.

Plant spacing in the beds is about 12" apart in all directions. We expect these species/varieties to take two seasons to fill in at this spacing, but it is already clear that the installed plants are happy. Growth and expansion have already begun to occur.

In the fall, we will plant some crocus species and a few miniature daffodils across the green roof. No idea if this will work, but the roof warms up early thanks to its exposure. It would be nice to get some really early color out there.

I've also got a reportedly sterile form of chives (Richter's 'Profusion') in the herb garden. If it is truly sterile (no seedlings!), I will do a test planting on the green roof, too. The texture, height and color of the chives foliage would be attractive, as would the flowering. And a sterile plant should bloom more-or-less continuously.  The plant does appear to make pollen, however. 

We have recently had some strong thunderstorms and associated downpours of rain. The very good news is that the green roof system we installed seems to be working. The beds are not splashing out planting mix --- the screening on top is working. Similarly, there is virtually ZERO migration of the planting mix or the perlite out of the boxes or through the drainage mat. The water dripping from the roof into the guttering is completely clear.

The pavers appear to be draining and drying out much faster with this system than with the old sand-filled system. No, we have not filled the cracks and crevices with fine sand. We may not do that at all. The boxes are forming a tight enough framework for the pavers that there may be no structural need for the sand as a surface binder. Yes, we expect dirt and seeds to end up between the pavers. That happened with the sand in the old system, too.

We thought about filling with vermiculite or perlite. Both would blow around when thoroughly dried out, and the green roof is in full sun. It will indeed dry out during July and August in our Northeastern US climate.  We may eventually end up binding the pavers together with fine sand.  Without the drainage mat, a significant amount of sand washed through the pavers and into the gutter.  This may not happen with the drainage mat in place, but the sand did retain water and helped to create a lot of moss and algae on the old roof garden.  We're hoping to avoid that with the new green roof.

Monday, May 23, 2005

Installation of planting boxes continues on my green roof

As is typical for most of our home projects, THIS one is bigger than we thought, and is taking more time than the original estimate.  We're at about the 60% mark, and the boxes and paths are looking really good.  We're pleased with the design and construction process. 

I had a "dry stream bed" planned to cut across the roof (actually for roof gutter outflow), but this may get cut back to a corrugated tube for convenience.  It's been a battle between rectangular boxes and free-form curves.  So far, the rectangles are winning outside of the railing. 

It also appears that we will run short of both lumber and planting mix.  My "be-as-exact-as-possible and then add 10% more" practice seems to have STILL been a little short, but we won't know how much short until we get that last box measured.  We attempted to do most of the boxes in a "standard" size to minimize waste, but are now down to having each box be made-to-fit. 

Now, to get it done and then planted.  The Memorial Day weekend approaches, and I suspect that we will be spending most of it planting, both the ground-level gardens and the green roof. 

We are taking pictures, and I'll post them to the blog as soon as I can.

Monday, May 16, 2005

Planting boxes being installed on our green roof

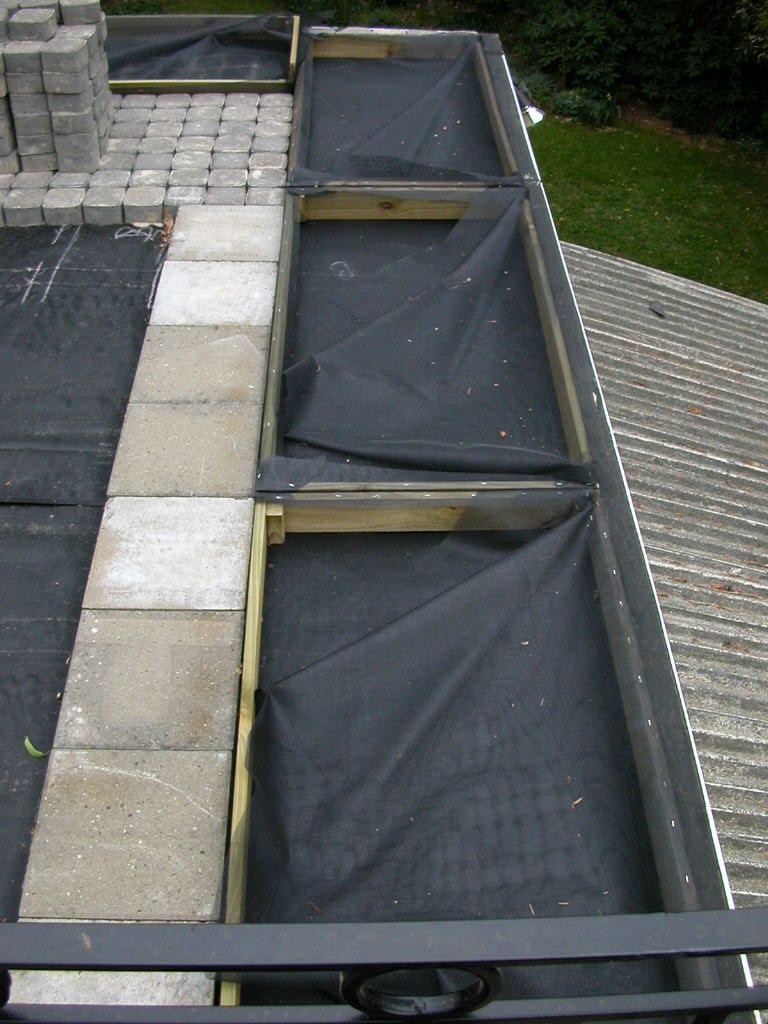
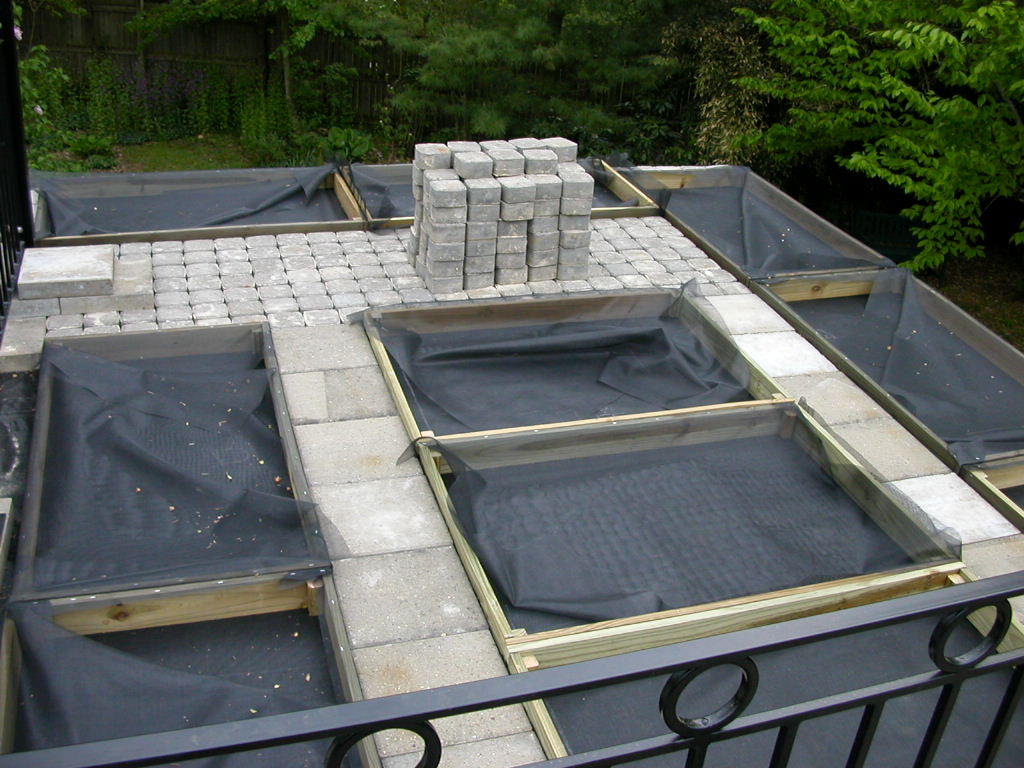
We spent the weekend building the planting boxes, getting about half of the garage roof covered. Each box is 24 to 30 inches wide, and up to 48" long. We're making them as close to a standard size as we can for our convenience, and then filling in any open space with pavers or river rock and gravel.

The box construction is from treated 1x4 pine, with the corners reinforced by small pieces of treated 2x2s. We're screwing the boards into the corner reinforcement with deck screws. For construction convenience, we are screwing the 2x2 pieces to the shorter 1x4 sides as a sub-assembly, and then making a jig from clamps and boards on a piece of plywood on sawhorses to put the sides (boards) and the sub-assemblies together. We tried to build the first couple of boxes on the driveway surface, but the driveway is not flat, and it increased the amount of bend-and-stoop we had to do. Elevating the worksurface --- and working on a flat stable surface --- made the boxes much more uniform, as well as making the task easier for our 50 year-old bodies.

Each screw goes into a pre-drilled hole to minimize splits, since we are screwing into two sides of the 2x2s. It took us a couple of hours to get a "system" worked out, but it is now going rather easily.

We lift the box to the roof surface, staple fiberglass screening to the bottom AND to the top, anchoring the top along one edge only. The box then goes into place.

The box is filled to about half-depth with perlite, and then filled the rest of the way with a commercial composted bark-based planting medium ( MetroMix 560).  We then pull the screening over the box, and staple down the remaining three sides. 
 
This week should see us getting the remainder of the boxes built and filled.  Planting will then begin.  Right now, we plan to use mostly sedums and sempervivums.  It is also very likely that we will do some trial plantings of small low-growing spring-flowering bulbs.  Our green roof installation is over an unheated garage, so the planting boxes will be exposed to cold temperatures both above and below.  I am expecting this to limit the species which will thrive under these conditions. 
 
There will be extensive planting posts as this project moves forward.  Species, varieties, sources, successes and failures.  And, of course, pictures. 

Wednesday, May 11, 2005

Green roof installation: drainage, railing, pavers

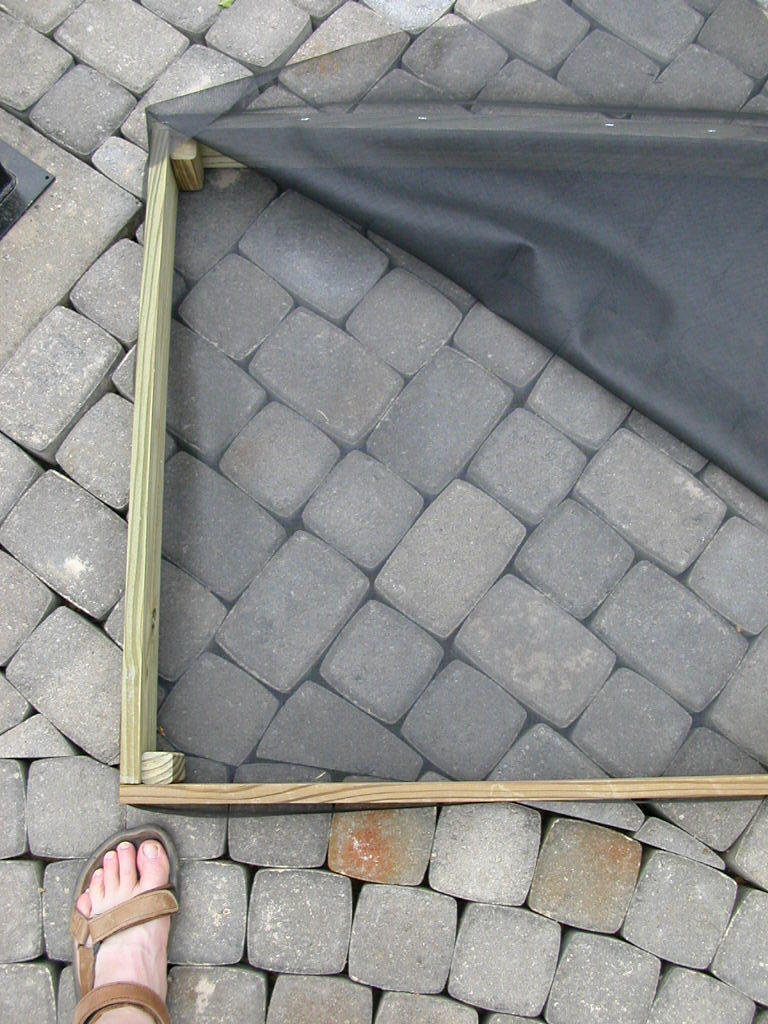
This is the old roof surface, pavers over EPDM membrane. The roll of material is the new drainage mat (Carlisle MiraDrain GR9200). The pavers have been on the membrane for six years. Sand had been swept into cracks.


New surface at about 50% installation on the right. Old surface on the left. We moved each paver at least 3X as we lifted the pavers and installed the drainage mat.


This is the reverse side of the drainage mat (Carlisle GR9200). The "cups" are about 1/4 inch deep. The cups are installed down, with the plastic against the EPDM membrane.


Close-up, reverse side of the drainage fabric, showing the cups.


Close-up of the drainage mat (Carlisle GR9200). Note that the woven fabric is see-through, and that the cups are now right-side up.


Roof surface 100% covered with drainage mat (Carlisle GR9200). Note the stack of pavers at the far corner.


Railing being installed. The railing had been on the original installation. We removed it, sand-blasted it, and had it powder-coated. Hand-painting the railing every three years with Rust-Oleum gets old quickly. Note the stacks of pavers at the rear of the roof.


First circle (ca. 9 ft) of pavers re-installed. There is a second circle to the right and to the rear of this one. We also fitted a quarter-circle in the near left corner. The remainder of the paver-covered surface will be in a modified running pattern.


Paver installation complete. Anything not covered by pavers will be covered by planting boxes or gravel-and-paver access paths.


More photos as the project moves ahead. We've started building the planting boxes, but no pictures yet.

Monday, May 09, 2005

The pavers are installed on our green roof

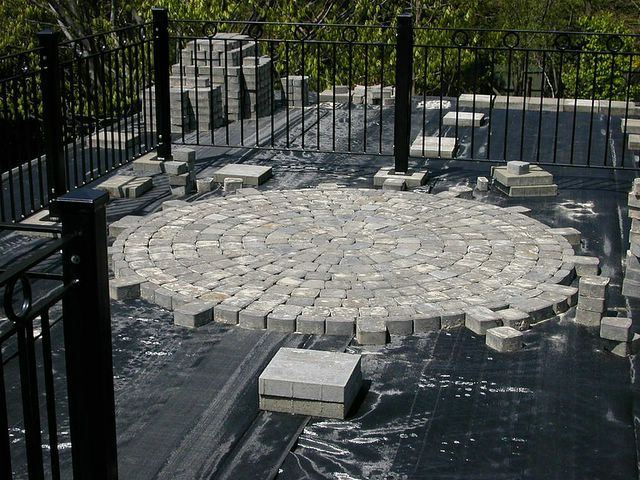
It took a long hard weekend, but the pavers are installed. We put in two circles --- about 8 ft each --- and a quarter circle in one of the corners.

The remainder of the roof surface will be planting boxes, made from treated 1x4 lumber in a grid of about 24" x 30". Actual dimensions will be to-fit. Each box will have fiberglass window-screen on the bottom to retain the planting mix, and window -screen on the top to keep the planting mix in the box, rather than being blown (or splashed) around the driveway and yard. We'll cut small Xs in the top screen so that we can plant, and within a year or so, the entire surface should be covered so that the boxes and screen will no longer be visible.

The boxes start this week, weather permitting. Everything is now on-hand, except for the window-screen destined for the tops of the boxes. That should arrive today by UPS.

Actually, the planting boxes will not cover the entire roof surface. We will install access paths to the boxes using the leftover pavers and river rock. We intend to create a dry stream of river rock (over a runner-style length of EPDM) across the roof to move the rainwater from one gutter system to that of the garage. And finally, we've got a small water feature planned for the "headwaters" of the dry stream that we hope will provide a constant trickling sound in the background.

I spent part of Sunday afternoon, propagating sempervivums and more sedums. I think that there are now 12 flats of 72 cells of plants destined for the roof. More on plant selection as the boxes get planted.

Wednesday, May 04, 2005

Installing the railing on our green roof

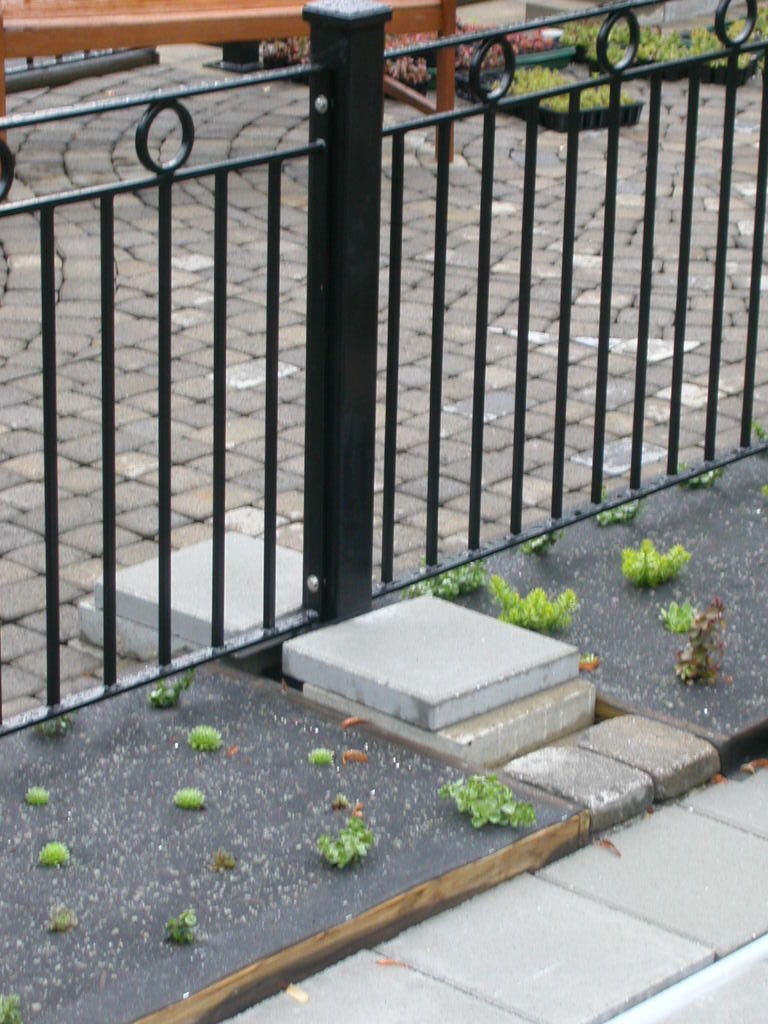
The railing installation (or re-installation) is complete, except for some bracing needed near the house, at the patio door.

The re-engineered railing is now in 6 or 8 ft sections, bolted together at the posts with stainless steel bolts. The original railing was sand-blasted, cut into sections for convenience, and powder-coated. We were without railing for almost a year --- we did an addition last year, and needed to remove the railing to facilitate the addition project. It looks soooo different, now that the railing is back in place.

The railing appears to be higher than before. Part of the visual difference is that my memory includes the height of the pavers, which are not yet in place. That 3" makes a big difference. The railing is also now installed ON TOP of the paver surface, rather than on the deck surface. Visually, then, I guess that the railing is actually appearing to be 6" higher than before. Half of that difference will go away once we get the pavers installed.

Which should begin this afternoon, weather permitting.

The lumber for the planting boxes is in the driveway. The perlite and MetroMix are being delivered today. Almost ready!

We are taking digital photos of each stage. Once I get some time to figure out the Blogger photo application, I'll post them.

Monday, May 02, 2005

Our green roof project --- turning a flat garage roof into a roof garden

Before you start with the new, you must deal with the old:

This project actually started 9 years ago, when we bought our house. The house has an attached garage --- with a flat roof. When we bought the house, the garage roof was sealed with asphalt, and covered in pea gravel. The first winter we were in the house, the roof leaked. Actually, there were indications (water stains) on the roof joists indicating that this was NOT a new problem, although there were no leaks during summer rains.

As a result, during the following summer, we removed the asphalt roofing, and replaced it with a fiberglass-reinforced EPDM membrane. At that point, I had the brainstorm that we should make that hot flat roof part of our living space by turning it into a Mediterranean roof garden.

We brought in a licensed engineer; reinforced the roof framing; added a jack post and a steel I-beam; had a railing fabricated to our specifications; and put down concrete pavers. We covered the roof deck with a second EPDM layer (used fabric from the roofing supplier, laid on top without adhesive, as a barrier from friction, penetration, and UV). Our original intent was to fill the roof space with containers and planters, and install drip-irrigation. Well, this worked OK, but there were a few problems with the original plan.

One, the roof was still very hot, even in our Northeastern US location. We had patio furniture on the roof, but rarely used it. The pavers retained a lot of heat, making evenings pleasant but mid-day almost unbearable.

Two, the drip irrigation worked well, but the roof deck surface did not drain especially well, nor especially completely. This resulted in long-lived puddles, algae, mosquito larvae. We had laid the pavers directly on top of the membrane (the friction barrier layer), and swept sand into the pavers as though it were a ground installation. This worked really well --- but drainage through the pavers and sand was not very fast. The pavers and sand remained moist most of the time, and we developed a great crop of moss, algae, and liverwort.

Three, the drip irrigation system (from DripWorks --- great folks, BTW) also worked well, but it did not withstand our summer sun and winter freezing very effectively.

Four, the original installation of the railing had the "feet" (the railing is supported by 4" steel posts at the corners and about every 8 lineal feet. Each post has a 6 or 8" square steel plate) UNDER the pavers. My thought at the time was that the pavers would lock the posts in place, and provide additional stability. What this really did was enable the steel plate to rust badly, since the sand/pavers rarely completely dried out.

So, we decided to lift all of the pavers; sandblast and powder-coat the railing; install a drainage fabric (a Carlisle product designed for green roof installation); re-install the railing and pavers; and then plant the entire roof surface with succulents. Our roof garden will become a green roof!

The renovation project began in earnest on 30-April-2005. Once I figure out how to post pictures to Blogger, I will post photos of the project. My intent is to describe every step of our project, from vendors, to the reasons for our choices, to plant species used in the garden.

At this point, the roof is covered by the drainage fabric, and the refurbished railing is being installed today. I've got 8 x 72 cell flats of various sedum species rooted and growing in the greenhouse. We should begin the re-install of the pavers tonight, weather permitting.

Photos soon. I promise.